


€489,00

 Przejdź do treści
1. Device pairing is required to complete the subsequent distribution network, connection, and other operations when first activating the glasses;
2. Please install the APP on the mobile phone, and open the APP for pairing operation;

You can refer to the following image to switch the system language.

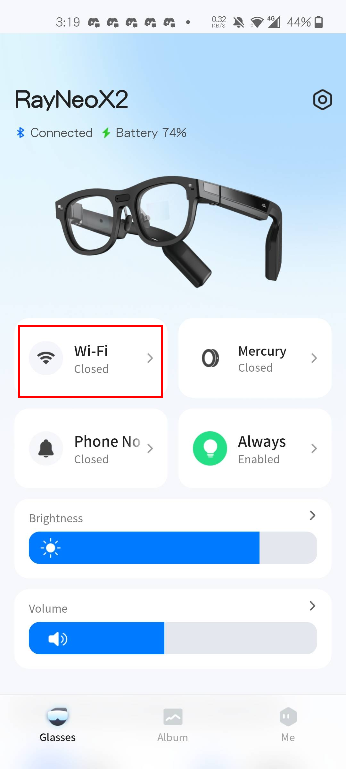
Currently, it is not possible to input text directly via glasses, so a mobile phone is required to connect to WiFi. After successfully pairing with the glasses, click on the WiFi module (as indicated in the red box in the diagram), select your network, and enter the password to connect.
Aby zapewnić bezproblemowe parowanie, najpierw upewnij się, że pierścień jest w pełni naładowany.
Metoda 1: Skrót
Metoda 2: Standardowa metoda
Przejdź do „Ustawienia -> Zarządzanie urządzeniami -> Parowanie pierścienia”, kliknij „Paruj”, a następnie włącz pierścień.
Zdjęcia i filmy zrobione za pomocą okularów można obecnie wyświetlić w aplikacji mobilnej: przejdź do Albumu → Albumu z okularów → Włącz tryb przesyłania → Połączono, aby pobrać zdjęcia i filmy do aplikacji.

【Instalowanie plików APK】
Możesz zainstalować plik APK na swoich inteligentnych okularach, łącząc je z komputerem za pomocą ADB.
Instrukcje dotyczące korzystania z ADB znajdziesz na stronie: https://developer.android.com/tools/adb
The latest version of the system, 1.2.66 and above, has added restrictions on adb installation. You can first enable the permission with the following command:
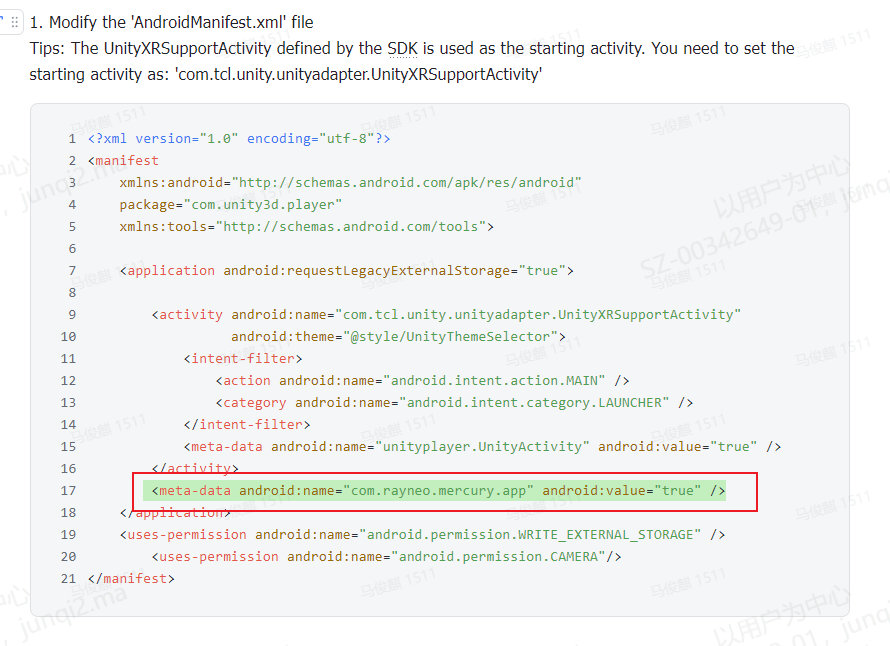
adb shell settings put global mercury_install_allowed 1After installing the third-party apk, you can find the corresponding entry in the "app center". If the entry is not found, you need to check whether the AndroidManifest.xml file has been configured correctly .
Ponieważ okulary są urządzeniami noszonymi na głowie, podczas tworzenia oprogramowania deweloperzy mogą potrzebować symulować działanie urządzenia i debugować je na komputerze. Do wyświetlania obrazu z ekranu zalecamy użycie następujących narzędzi:
Scenariusz pierwszy: Przywracanie parowania z pierwotnym telefonem
Jak pokazano na ilustracji, jeśli automatyczne połączenie się nie powiedzie (jak poniżej), wykonaj następujące kroki:

Scenario Two: The Glasses Need to be Paired with Another Phone
Aplikacja Mercury wymaga systemu Android 10 lub nowszego. Sprawdź wersję Androida.
Najnowsza wersja systemu, 1.2.66 i nowsze, wprowadza ograniczenia dotyczące instalacji za pomocą adb. Najpierw możesz włączyć uprawnienie za pomocą następującego polecenia:
adb shell settings put global mercury_install_allowed 1
W okularach znajdują się 3 mikrofony. Jeśli potrzebujesz lepszej jakości nagrania, możesz wybrać jeden z mikrofonów w zależności od potrzeb. Unity wywołuje warstwę interfejsu natywnego, którą możesz skonfigurować zgodnie z poniższymi parametrami. PS: Domyślnie aktywny jest mikrofon z przodu okularów.
| Set the status notification when each apk calls mic audioHAL; AudioManager.setparameter("audio_source=xxxx"); | ||
| audio record: | not configure yet | setParameters("audio_source_record=sound") |
| camera record: | call the 2 mics on the temple, all the sound is received, no noise reduction algorithm | setParameters("audio_source_record=camcorder") |
| translation: | Call 3 mics, do not receive the user's voice, but receive external voices | setParameters("audio_source_record=translation") |
| voice assistant: | Call the 2 mics on the temple, mainly receive the user's voice | setParameters("audio_source_record=voiceassistant") |
| To make sure each application has its own mic combination, please set "setParameters("audio_source_record=off" when exit. | ||
Using the camcorder mode, when channel=2, it calls two microphones; when channel=1, it calls the microphone above the nose rest.


Poniżej znajduje się samouczek dotyczący tworzenia aplikacji, który pomoże uniknąć przegrzewania się płyty głównej, wyłączania systemu i nieprawidłowego wyświetlania:


