


€489,00

 Ga naar de inhoud
1. Device pairing is required to complete the subsequent distribution network, connection, and other operations when first activating the glasses;
2. Please install the APP on the mobile phone, and open the APP for pairing operation;

You can refer to the following image to switch the system language.

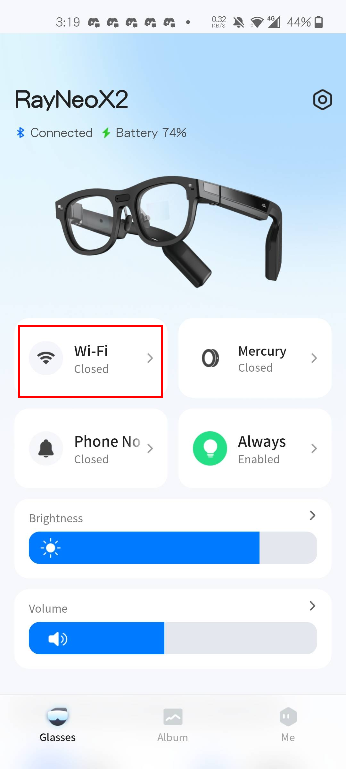
Currently, it is not possible to input text directly via glasses, so a mobile phone is required to connect to WiFi. After successfully pairing with the glasses, click on the WiFi module (as indicated in the red box in the diagram), select your network, and enter the password to connect.
Laad de ring eerst volledig op om ervoor te zorgen dat het koppelen soepel verloopt.
Methode 1: Snelkoppeling
Methode 2: Standaardmethode
Ga naar 'Instellingen -> Apparaatbeheer -> Ring koppelen', tik op 'Koppelen' en schakel vervolgens de ring in.
Foto's en video's die met de bril zijn gemaakt, kunnen momenteel in de mobiele app worden bekeken: Ga naar Album→Brilalbum→Ga naar de overdrachtsmodus→Verbonden om de foto's en video's in de app te bekijken.

【APK installeren】
Je kunt een APK op je slimme bril installeren door deze via ADB op je pc aan te sluiten.
Raadpleeg voor instructies over het gebruik van ADB: https://developer.android.com/tools/adb
The latest version of the system, 1.2.66 and above, has added restrictions on adb installation. You can first enable the permission with the following command:
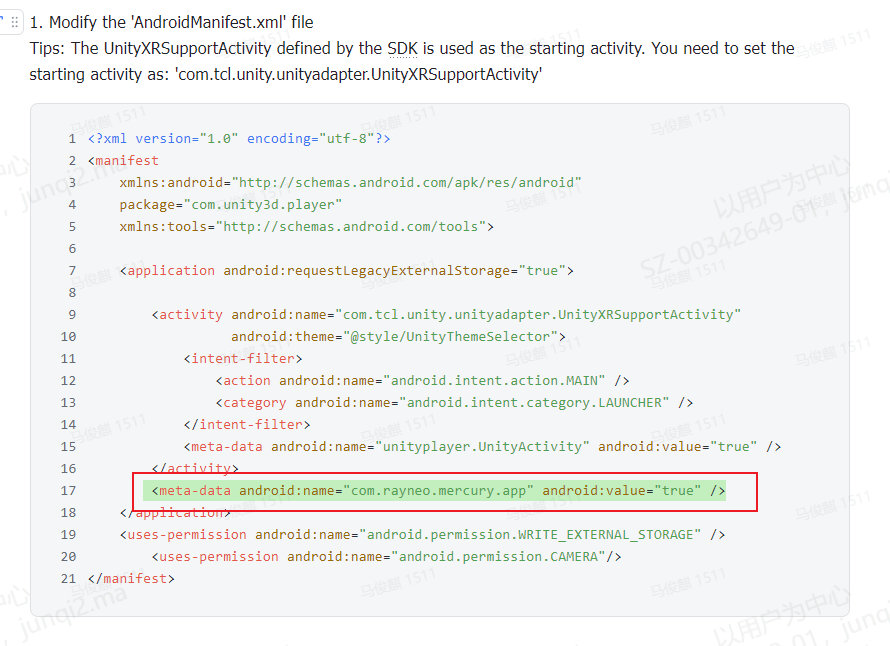
adb shell settings put global mercury_install_allowed 1After installing the third-party apk, you can find the corresponding entry in the "app center". If the entry is not found, you need to check whether the AndroidManifest.xml file has been configured correctly .
Omdat een bril op het hoofd wordt gedragen, moeten ontwikkelaars tijdens het ontwikkelproces mogelijk simuleren en debuggen op de computer. Voor schermprojectie worden de volgende tools aanbevolen:
Scenario één: de koppeling met de oorspronkelijke telefoon herstellen
Zoals weergegeven in de afbeelding: probeer de volgende stappen als automatisch verbinden mislukt (zoals hieronder te zien is):

Scenario Two: The Glasses Need to be Paired with Another Phone
Mercury App moet draaien op Android 10 of hoger. Controleer uw Android-versie.
In de nieuwste versie van het systeem, 1.2.66 en hoger, zijn beperkingen voor installatie via adb toegevoegd. Je kunt de toestemming eerst inschakelen met de volgende opdracht:
adb shell settings put global mercury_install_allowed 1
Er zitten 3 microfoons op de bril. Als je een betere opnamekwaliteit nodig hebt, kun je naar wens een van de microfoons selecteren. Unity roept de native interfacelaag aan en je kunt deze configureren volgens de onderstaande parameters.ps: standaard wordt de microfoon aan de voorkant van de bril geactiveerd.
| Set the status notification when each apk calls mic audioHAL; AudioManager.setparameter("audio_source=xxxx"); | ||
| audio record: | not configure yet | setParameters("audio_source_record=sound") |
| camera record: | call the 2 mics on the temple, all the sound is received, no noise reduction algorithm | setParameters("audio_source_record=camcorder") |
| translation: | Call 3 mics, do not receive the user's voice, but receive external voices | setParameters("audio_source_record=translation") |
| voice assistant: | Call the 2 mics on the temple, mainly receive the user's voice | setParameters("audio_source_record=voiceassistant") |
| To make sure each application has its own mic combination, please set "setParameters("audio_source_record=off" when exit. | ||
Using the camcorder mode, when channel=2, it calls two microphones; when channel=1, it calls the microphone above the nose rest.


Hieronder volgt een tutorial voor appontwikkeling die nodig is om oververhitting van het moederbord, uitschakeling van het systeem en afwijkende weergave te voorkomen:


