


€489,00

 Vai al contenuto
1. Device pairing is required to complete the subsequent distribution network, connection, and other operations when first activating the glasses;
2. Please install the APP on the mobile phone, and open the APP for pairing operation;

You can refer to the following image to switch the system language.

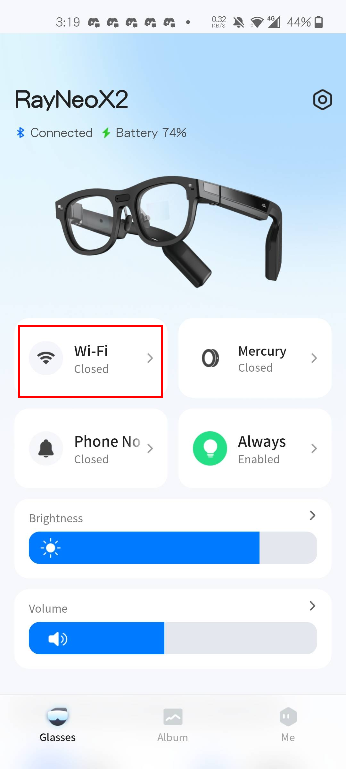
Currently, it is not possible to input text directly via glasses, so a mobile phone is required to connect to WiFi. After successfully pairing with the glasses, click on the WiFi module (as indicated in the red box in the diagram), select your network, and enter the password to connect.
Per garantire un abbinamento senza problemi, assicurati prima che l'anello sia completamente carico.
Metodo 1: Scorciatoia
Metodo 2: Metodo standard
Vai su «Impostazioni -> Gestione dispositivi -> Abbinamento anello», premi «Abbina», quindi accendi l'anello.
Le foto e i video scattati con gli occhiali possono essere visualizzati al momento nell’app mobile: vai su Album→Album occhiali→Accedi alla modalità di trasferimento→Connesso per ottenere le foto e i video nell’app.

【Installazione dell’APK】
Puoi installare un APK sui tuoi occhiali smart collegandoli al PC tramite ADB.
Per istruzioni sull’uso di ADB, consulta: https://developer.android.com/tools/adb
The latest version of the system, 1.2.66 and above, has added restrictions on adb installation. You can first enable the permission with the following command:
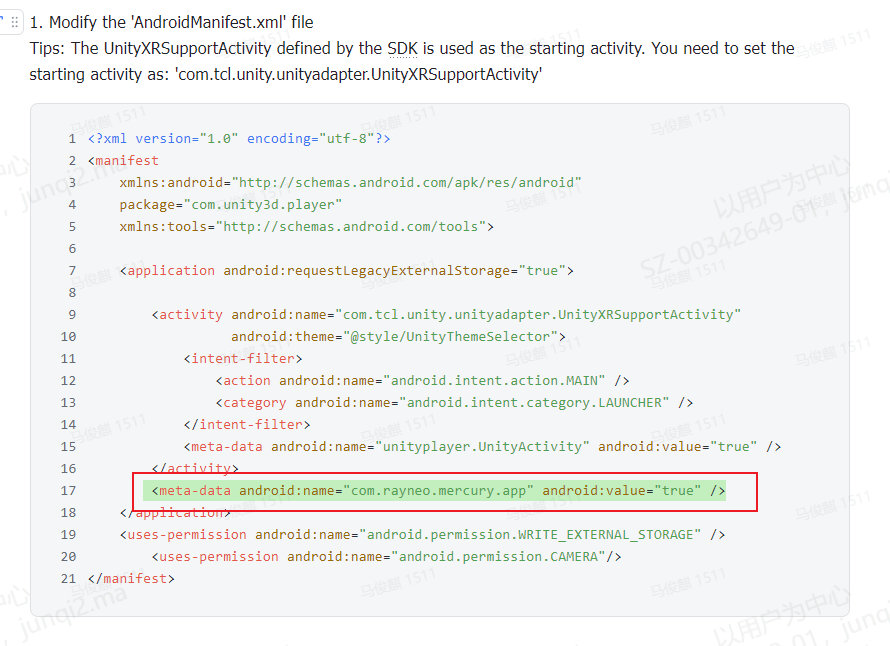
adb shell settings put global mercury_install_allowed 1After installing the third-party apk, you can find the corresponding entry in the "app center". If the entry is not found, you need to check whether the AndroidManifest.xml file has been configured correctly .
Poiché gli occhiali sono dispositivi indossabili sulla testa, durante lo sviluppo potrebbe essere necessario simulare e fare debug sul computer. Si consiglia di utilizzare i seguenti strumenti per proiettare lo schermo:
Scenario uno: ripristinare l'associazione con il telefono originale
Come mostrato nella figura, se la connessione automatica non riesce (come illustrato qui sotto), prova a seguire questi passaggi:

Scenario Two: The Glasses Need to be Paired with Another Phone
Mercury App deve funzionare su Android 10 o versioni successive. Controlla la tua versione di Android.
L’ultima versione del sistema, dalla 1.2.66 in poi, ha introdotto restrizioni sull’installazione tramite adb. Puoi abilitare prima l’autorizzazione con il seguente comando:
adb shell settings put global mercury_install_allowed 1
Sugli occhiali sono presenti 3 microfoni. Se hai bisogno di una qualità di registrazione migliore, puoi scegliere quale microfono utilizzare in base alle tue esigenze. Unity richiama il livello dell’interfaccia nativa, che puoi configurare in base ai parametri riportati di seguito.ps: la modalità predefinita attiva il microfono frontale degli occhiali.
| Set the status notification when each apk calls mic audioHAL; AudioManager.setparameter("audio_source=xxxx"); | ||
| audio record: | not configure yet | setParameters("audio_source_record=sound") |
| camera record: | call the 2 mics on the temple, all the sound is received, no noise reduction algorithm | setParameters("audio_source_record=camcorder") |
| translation: | Call 3 mics, do not receive the user's voice, but receive external voices | setParameters("audio_source_record=translation") |
| voice assistant: | Call the 2 mics on the temple, mainly receive the user's voice | setParameters("audio_source_record=voiceassistant") |
| To make sure each application has its own mic combination, please set "setParameters("audio_source_record=off" when exit. | ||
Using the camcorder mode, when channel=2, it calls two microphones; when channel=1, it calls the microphone above the nose rest.


Di seguito è riportato un tutorial per lo sviluppo di app, necessario per evitare il surriscaldamento della scheda madre, l'arresto del sistema e anomalie del display:


