

€489,00

 Passer au contenu
Aucun résultat trouvé. Essayez un autre mot-clé.
Trouvez tout ce dont vous avez besoin pour configurer vos lunettes, explorer les fonctions et tirer le meilleur parti de votre expérience RayNeo iO.
Vous ne trouvez pas la réponse que vous cherchez ? Notre équipe d'assistance est là pour vous aider. Contactez-nous à : service@rayneo.com
Version standard :
L'Application RayNeo AI est requise pour terminer la configuration et le processus d'appairage de vos RayNeo iO AI Glasses. Avant d'activer vos lunettes, veuillez télécharger et installer l'Application RayNeo AI sur votre smartphone.
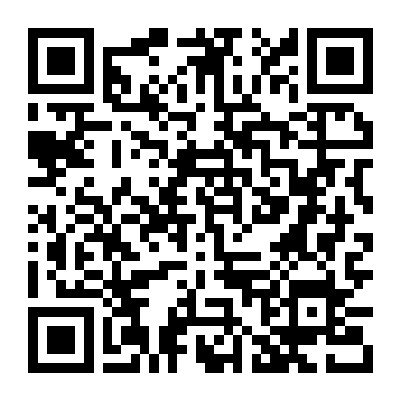
Téléchargement de l'application https://rayneo.cn/commonPage/venus/appDownload/index_m.html
Scannez le code QR ci-dessous pour télécharger :
Veuillez vous assurer que :
Pendant la configuration, l'Application RayNeo AI peut demander les autorisations nécessaires pour la connexion de l'appareil et les fonctions intelligentes. Veuillez accorder les autorisations nécessaires et suivre les instructions affichées dans l'application.
(les détails des autorisations doivent être confirmés en fonction de la version finale de l'application).
Avant d'utiliser vos RayNeo iO AI Glasses pour la première fois, effectuez le processus d'activation et d'appairage en suivant les étapes ci-dessous.
Étape 1 : Activer vos lunettes
Étape 2 : Préparer l'appairage Bleutooth
Lorsque les lunettes passent en mode d'appairage, le voyant à l'extrémité de la branche affiche une lumière pulsante bleue.
Étape 3 : Terminer l'appairage dans l'application
Une fois l'appairage terminé, les lunettes se connecteront automatiquement à votre téléphone.
Après le premier appairage réussi :
Vous n'avez pas besoin d'appairer manuellement les lunettes à chaque fois que vous les utilisez.
Pour les utilisateurs Android, veuillez suivre les instructions de l'application pour autoriser l'activité en arrière-plan Autoriser l'activité en arrière-plan permet à l'application RayNeo AI de rester active en arrière-plan, en maintenant une connexion Bleutooth plus stable et en réduisant les interruptions de connexion lorsque l'écran est éteint ou que l'application passe en arrière-plan.
Pour connecter vos lunettes à un autre téléphone :
Si les lunettes ne peuvent pas se connecter :
Si le témoin lumineux devient rouge ou ne s'allume pas, un problème de charge a pu se produire. Veuillez
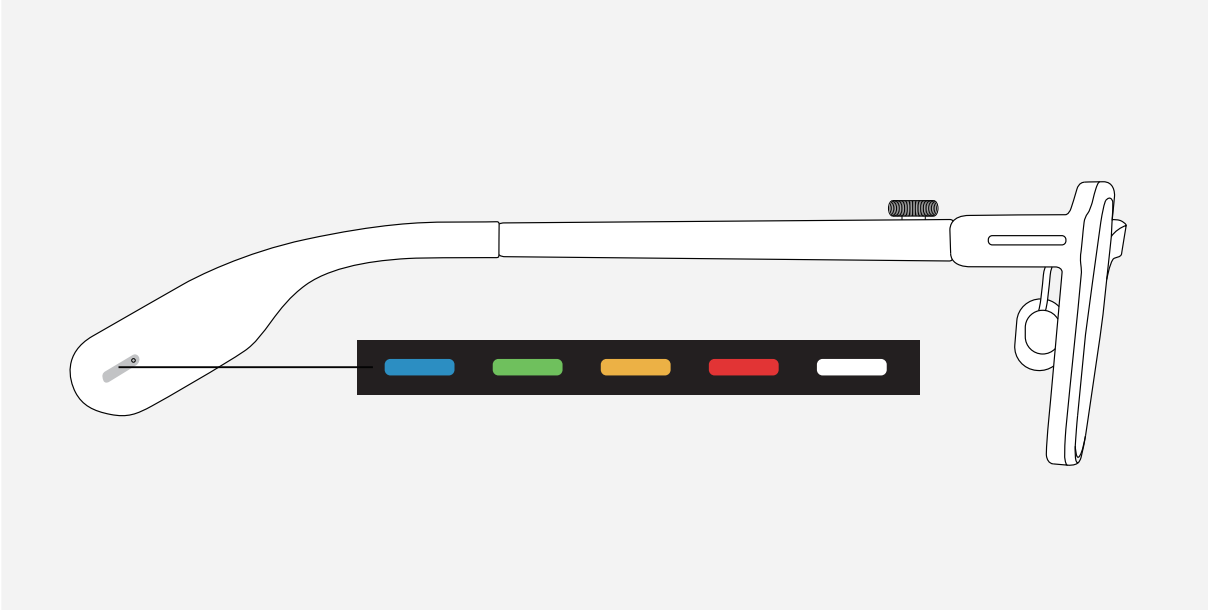
Le témoin lumineux indique le statut actuel de vos RayNeo iO AI Glasses.
| Témoin lumineux | Statut |
|---|---|
| Bleu | Appairage |
| Jaune | En charge |
| Vert | Entièrement chargé |
| Rouge | Erreur de charge |
| Blanc | Microphone actif |
Les RayNeo iO AI Glasses prennent en charge deux méthodes de chargement :
Choisissez la méthode de chargement qui correspond le mieux à vos besoins.
La pince de charge est la méthode de chargement standard pour les RayNeo iO AI Glasses.
Comment charger
| Témoin lumineux des lunettes | Statut |
|---|---|
| Lumière pulsante blanche | Mise sous tension |
| Lumière pulsante bleue | Mode d'appairage (prêt à connecter un nouveau téléphone) |
| Lumière blanche | Microphone en cours d'utilisation |
| Lumière jaune | En charge |
| Lumière verte | Chargement terminé |
| Rouge clignotant | Erreur de charge |
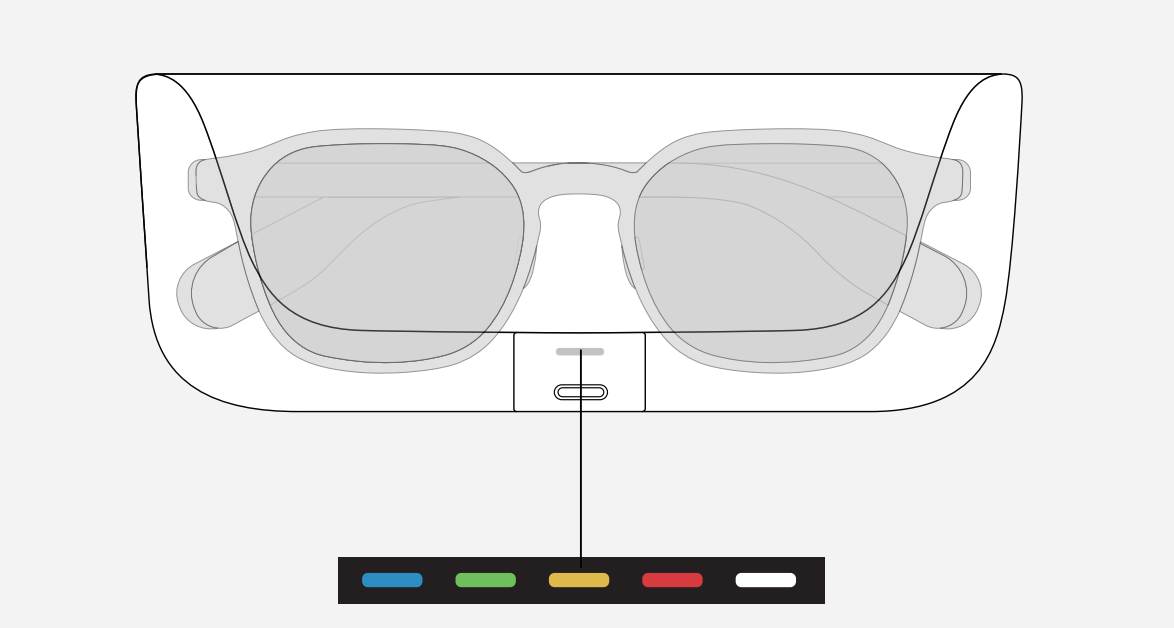
Si vous avez acheté le Boîtier de charge pour lunettes RayNeo iO séparément, vous pouvez charger vos RayNeo iO AI Glasses en plaçant les lunettes dans le boîtier de charge. Le Boîtier de charge pour lunettes offre une solution de charge plus pratique lorsque vous voyagez ou que vous êtes loin d'une source d'alimentation.
Comment charger
Pendant le chargement :
| Témoin lumineux du boîtier de charge | Statut |
|---|---|
| Lumière verte | Charge suffisante |
| Lumière jaune | Charge limitée |
| Lumière rouge clignotante | Charge faible et impossible de charger les lunettes |
| Rouge clignotant | Erreur de charge |
| Lumière verte pulsante | Chargement terminé |
| Lumière jaune pulsante | En charge |
| Lumière pulsante bleue | Les lunettes à l'intérieur du boîtier sont en mode d'appairage |
Vous pouvez vérifier le niveau de batterie restant des lunettes et du boîtier de charge dans l'Application RayNeo AI.
Les RayNeo iO AI Glasses offrent des commandes intuitives grâce à la Smart Crown, aux mouvements de la tête et aux paramètres de l'application, vous permettant d'interagir naturellement avec les informations sans avoir à utiliser fréquemment votre téléphone.
La Smart Crown se trouve sur le côté avant supérieur de la branche droite. Elle vous permet de naviguer rapidement dans les menus, de sélectionner des fonctions et de contrôler vos lunettes.
| Opération | Fonction |
|---|---|
| Faire pivoter la Couronne | Parcourir le tableau de bord, la liste d'applications et diverses listes. Les éléments s'affichent un par un selon l'ordre défini dans l'application. |
| Simple clic | Sélectionner ou ouvrir un élément. Lorsque l'affichage est éteint, un simple clic active le tableau de bord. |
| Maintenir appuyé | Revenir à l'accueil du tableau de bord. |
Vous pouvez personnaliser des actions supplémentaires de la Smart Crown dans :
Onglet Lunettes → Paramètres → Commandes de la couronne
Vous pouvez assigner des fonctions fréquemment utilisées en :
L'affichage tête haute autorise les lunettes à réveiller automatiquement l'écran lorsque vous levez la tête à un angle prédéfini.
Lorsqu'il est activé :
Vous pouvez personnaliser l'angle de déclenchement dans :
Onglet Lunettes → Paramètres → Affichage tête haute
Paramètres disponibles :
Les commandes de la tête vous permettent d'interagir avec les notifications et les suggestions RayNeo grâce à de simples mouvements de tête, sans utiliser vos mains.
Lorsqu'une notification ou une suggestion RayNeo apparaît :
Vous pouvez gérer cette fonction dans :
Onglet Lunettes → Commandes de la tête
Vous pouvez ajuster la position de l'affichage pour une expérience visuelle plus confortable.
Ajuster la position de l'affichage
Personnalisez la position de l'affichage selon vos préférences de visualisation.
Le mode Focus aide à réduire les interruptions en désactivant le son de certains contenus proactifs.
Lorsque le mode Focus est activé, le contenu suivant sera mis en sourdine :
Vous pouvez contrôler le mode Focus via :
Vous pouvez également définir un planning récurrent pour le mode Focus.
Le tableau de bord est l'interface principale pour afficher des informations sur les RayNeo iO AI Glasses. Il offre un accès rapide à : l'heure, la météo, le niveau de batterie, le calendrier, les tâches, les actions, le courrier, l'horloge mondiale.
Le tableau de bord vous aide à consulter des informations importantes sans sortir votre téléphone.
Vous pouvez ouvrir le tableau de bord de deux manières :
Affichage tête haute
Levez la tête jusqu'à l'angle prédéfini pour allumer automatiquement l'affichage et accéder au tableau de bord.
Smart Crown
Lorsque l'affichage est éteint, faites un simple clic sur la Smart Crown pour activer le tableau de bord.
Faites pivoter la Smart Crown pour parcourir les widgets du tableau de bord un par un. Les widgets s'affichent selon l'ordre configuré dans l'Application RayNeo AI.
Maintenez la Smart Crown appuyée pour revenir à l'accueil du tableau de bord.
Depuis le tableau de bord :
Le tableau de bord prend en charge jusqu'à 5 widgets. Les widgets disponibles incluent :
| Widget | Description |
|---|---|
| À faire | Affiche vos informations de tâches. Lorsqu'il y a trop d'éléments, des widgets sont ajoutés automatiquement. |
| Calendrier | Affiche les événements en cours et à venir en fonction de votre source de calendrier connectée, y compris les événements sur toute la journée. |
| Météo | Affiche la météo actuelle, la température, les températures maximales et minimales du jour et la tendance météo des 5 prochaines heures. |
| Actions | Affiche les cours des actions et les variations en pourcentage des actions que vous suivez. |
| Courrier | Affiche les derniers e-mails non lus et le nombre total d'e-mails non lus de votre boîte aux lettres connectée. |
| Horloge mondiale | Affiche l'heure locale, le fuseau horaire et le décalage horaire pour une ville sélectionnée. |
Le tableau de bord affiche également des informations de base telles que : l'heure, la météo locale, le niveau de batterie des lunettes.
Certains widgets nécessitent une configuration initiale avant de pouvoir afficher des informations. Par exemple :
Vous pouvez gérer les widgets du tableau de bord dans :
Onglet Lunettes → Paramètres du tableau de bord
À partir d'ici, vous pouvez : ajouter ou supprimer des widgets, modifier l'ordre des widgets.
Le tableau de bord prend en charge deux modes d'affichage :
Le mode classique affiche des cartes de widgets avec des informations détaillées.
Le mode minimal offre une vue plus épurée et n'affiche que : l'heure, la météo, le niveau de batterie.
Vous pouvez changer les modes d'affichage du tableau de bord dans l'Application RayNeo AI.
Les RayNeo iO AI Glasses offrent des fonctions de reconnaissance vocale et de traduction en temps réel pour vous aider à communiquer plus facilement dans les conversations, les réunions et les scénarios multilingues.
Que sont les sous-titres en direct ?
Les sous-titres en direct convertissent la parole en texte en temps réel et affichent les sous-titres directement dans votre champ de vision. Cela vous aide à saisir des informations importantes dans des situations telles que :
Grâce au réseau de microphones intégré, les lunettes peuvent distinguer la voix du porteur de celle des autres interlocuteurs. Les sous-titres privilégient la parole de l'autre personne et filtrent votre propre voix, vous aidant à vous concentrer sur les informations les plus importantes.
Les sous-titres en direct prennent en charge la traduction bidirectionnelle dans 55 langues .
Lancer les sous-titres en direct
Vous pouvez démarrer les sous-titres en direct de deux manières :
Depuis les lunettes :
Depuis l'Application RayNeo AI :
Avant de commencer : sélectionnez la langue parlée par l'autre personne. Assurez-vous que votre téléphone dispose d'une connexion réseau disponible. Les lunettes reconnaîtront la parole en fonction de la langue sélectionnée et afficheront les sous-titres en temps réel.
Affichage des sous-titres
Les sous-titres en direct affichent principalement la parole de l'autre personne et filtrent votre propre voix. Cela vous permet de vous concentrer sur les informations dont vous avez besoin pendant une conversation.
Consulter les sous-titres précédents
Vous pouvez consulter les sous-titres précédents pendant une session active de sous-titres en direct. Pour consulter :
Après une courte pause, l'affichage revient automatiquement à la conversation en cours.
Enregistrer et gérer les enregistrements de sous-titres
Une fois la conversation terminée, la transcription complète est enregistrée dans Sessions . Depuis Sessions, vous pouvez :
La traduction en temps réel est une fonction étendue des sous-titres en direct qui permet des conversations bilingues en face à face.
Pour démarrer :
Pendant la traduction :
Pendant la lecture vocale, la capture audio se met automatiquement en pause. Une fois la conversation terminée, les textes original et traduit sont enregistrés côte à côte. Les messages s'affichent sous forme de bulles de conversation, chaque interlocuteur étant identifié.
La calibration en direct contrôle la façon dont le texte traduit apparaît pendant la traduction en temps réel. Vous pouvez ajuster ce paramètre selon votre préférence pour la vitesse ou la stabilité.
Lorsque la calibration en direct est activée : La traduction se met à jour mot par mot au fur et à mesure que la personne parle. Le texte apparaît plus rapidement, mais le texte affiché peut se déplacer pendant la conversation.
Lorsque la calibration en direct est désactivée : La traduction apparaît une fois la phrase complète reconnue. L'affichage du texte est plus stable.
Les RayNeo iO AI Glasses vous permettent d'enregistrer rapidement des conversations et de générer des résumés alimentés par l'IA sans tenir votre téléphone ou utiliser des appareils d'enregistrement supplémentaires. Avec Voice Memo, vous pouvez capturer des conversations, convertir la parole en texte et générer des résumés structurés incluant les points clés et les actions à réaliser.
Vous pouvez démarrer l'enregistrement de plusieurs manières :
Voice Memo prend en charge deux modes de captation :
Vous pouvez marquer des moments importants pendant l'enregistrement. Manières d'ajouter une marque :
Remarques :
Vous pouvez arrêter l'enregistrement de trois manières :
L'enregistrement est sauvegardé automatiquement une fois l'enregistrement terminé.
Après l'enregistrement, la transcription est générée dans Sessions . Voice Memo prend en charge :
Lorsque la reconnaissance de l'orateur est activée, le système peut séparer les différents orateurs et les renommer. Une fois la transcription terminée, l'IA génère automatiquement un résumé structuré comprenant : conclusions clés, tâches à réaliser. Vous pouvez également utiliser des modèles pour générer des résumés à partir de différentes perspectives.
Les enregistrements sauvegardés et le contenu généré peuvent être consultés dans Sessions . Vous pouvez :
Assistance linguistique La transcription de Voice Memo prend en charge : 96 langues
Les RayNeo iO AI Glasses utilisent l'affichage proche de l'œil et la reconnaissance vocale pour afficher votre script directement dans votre champ de vision, afin que vous puissiez parler naturellement tout en maintenant un contact visuel avec votre public.
Vous pouvez également affiner la taille du texte, les interlignes, la largeur et la profondeur d'affichage pour les adapter à vos préférences, ou utiliser les scènes prédéfinies ci-dessous.
Choisissez le mode qui correspond à votre façon de parler et changez-en à tout moment :
Basculez entre des scènes prédéfinies pour différents réglages — comme Présentation et Enregistrement vidéo — pour appliquer la meilleure mise en page d'un seul toucher.
Créez ou importez un script dans RayNeo AI App — les formats txt, docx et pdf sont pris en charge — ou ouvrez la Liste des applications sur les lunettes et sélectionnez Prompteur.
Créer un nouveau script :
Importer des scripts : Vous pouvez importer des scripts à partir de fichiers système. Formats pris en charge : TXT, DOC, DOCX, PDF. Après l'importation, la mise en forme est supprimée, les images sont filtrées et seul le contenu textuel est conservé.
Gestion des scripts : Les scripts sont organisés par : Épinglés, Récents. Les scripts sont triés par date de mise à jour. Actions disponibles : balayer vers la gauche pour supprimer, balayer vers la droite pour épingler, toucher une carte de script pour prévisualiser.
Vous pouvez démarrer le prompteur de deux manières :
Après l'ouverture sur les lunettes :
Pendant l'utilisation :
Les RayNeo iO AI Glasses offrent une interaction vocale avec l'IA, vous permettant de contrôler les fonctions, de poser des questions et d'accéder à vos enregistrements personnels grâce à des conversations naturelles.
Vous pouvez réveiller RayNeo AI de trois manières :
RayNeo AI prend en charge trois types d'interactions :
Contrôle de l'appareil
Vous pouvez utiliser des commandes vocales pour contrôler des fonctions telles que :
Requêtes d'informations
Demander à RayNeo AI des informations telles que : météo, vacances, dernières infos, questions de culture générale
Requêtes sur les enregistrements personnels
RayNeo AI peut rechercher dans votre base de connaissances personnelle pour répondre à des questions en fonction de vos enregistrements sauvegardés. Les sources prises en charge incluent : Voice Memo, Sous-titres en direct, Autres enregistrements sauvegardés
Exemple : « Quelles étaient mes tâches à faire de la réunion de la semaine dernière ? »
Vous pouvez interagir avec RayNeo AI via l'application RayNeo AI. Vous pouvez lancer une conversation à partir de : page RayNeo AI, page Sessions. Vous pouvez saisir ou prononcer votre question.
Rechercher vos enregistrements RayNeo AI peut répondre à des questions à partir de votre base de connaissances personnelle. Vous pouvez personnaliser la portée de la recherche à l'aide de balises de type de données, telles que : Voice Memo, Sous-titres en temps réel, Life Log. Vous pouvez ajouter ou supprimer des balises selon vos besoins. Vous pouvez également enregistrer une réponse générée par l'IA comme nouvel onglet de résumé en un seul toucher.
Les RayNeo iO AI Glasses prennent en charge des options flexibles de modèles d'IA, vous permettant de choisir l'expérience IA qui correspond le mieux à vos besoins.
Sélection du modèle d'IA : Les utilisateurs peuvent choisir parmi : RayNeo AI, Plusieurs modèles d'IA courants
Services d'IA, notamment : Assistant RayNeo AI sur les lunettes, « Demander à l'IA » dans RayNeo AI App, Résumé IA, Autres fonctionnalités basées sur l'IA. Vous pouvez utiliser votre modèle d'IA préféré.
Un abonnement débloque des modèles d'IA avancés supplémentaires.
Un entretien approprié aide à préserver l'apparence, le confort et la performance optique de vos RayNeo iO AI Glasses.
RayNeo iO AI Glasses est compatible avec les verres correcteurs.
Pour protéger les verres et la monture :
Pour l'entretien quotidien :
Les verres traités offrent une expérience visuelle plus claire et plus transparente, mais ils peuvent présenter plus facilement des traces de doigts et de la saleté.
Pour préserver le traitement des verres : évitez tout contact avec des :
Si de la poussière, des particules de sable ou des taches d'huile tenaces sont présentes :
Gardez les pièces métalliques propres et évitez tout contact avec des substances chimiques telles que les acides et les alcalis.
La transpiration, les cosmétiques et la laque pour cheveux peuvent provoquer :
Si ces substances entrent en contact avec les lunettes, essuyez-les immédiatement avec un chiffon ou une lingette spécialement conçus pour les verres.
Les RayNeo iO AI Glasses sont conçues avec des témoins de confidentialité et des commandes utilisateur pour vous aider à gérer vos données.
Lorsque Voice Memo ou les fonctions associées au microphone sont actives, un témoin lumineux blanc apparaît à l'extrémité de la branche.
Life Log ne stocke pas les enregistrements audio originaux. Il ne conserve que :
L'audio original n'est pas conservé.
Vous pouvez gérer vos balises de profil personnel dans Vous concernant .
Toutes les balises de profil à long terme peuvent être :
Vous gardez le contrôle des informations de votre profil personnel.
Cette section fournit des solutions aux problèmes courants avec les RayNeo iO AI Glasses.
L'écran est incomplet, flou ou décalé
Si l'affichage apparaît incomplet, flou ou décalé :
Réglez les paramètres d'affichage jusqu'à ce que l'image soit agréable à regarder.
Problèmes de connexion Bleutooth ou déconnexions fréquentes
Essayez ce qui suit :
Utilisateurs Android Follow the in-app autoriser l'activité en arrière-plan instructions pour garder l'application RayNeo AI active en arrière-plan. Cela aide à maintenir la stabilité Bleutooth et réduit les déconnexions lorsque : l'écran du téléphone est éteint, l'application passe en arrière-plan.
Impossible de se connecter après avoir changé de téléphone
Lors de la connexion des lunettes à un nouveau téléphone :


