


€489,00

 Siirry sisältöön
1. Device pairing is required to complete the subsequent distribution network, connection, and other operations when first activating the glasses;
2. Please install the APP on the mobile phone, and open the APP for pairing operation;

You can refer to the following image to switch the system language.

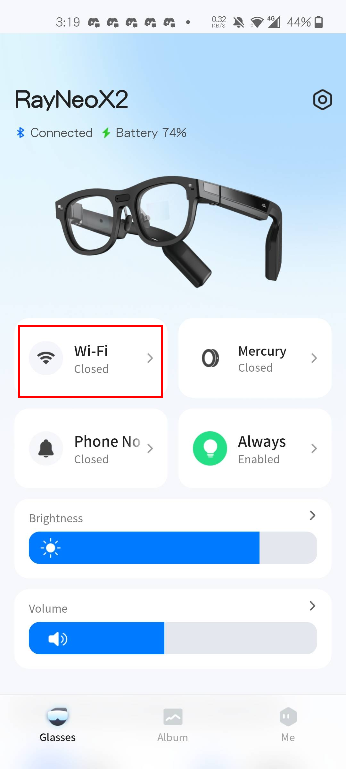
Currently, it is not possible to input text directly via glasses, so a mobile phone is required to connect to WiFi. After successfully pairing with the glasses, click on the WiFi module (as indicated in the red box in the diagram), select your network, and enter the password to connect.
Varmista sujuva pariliitoksen muodostaminen varmistamalla ensin, että sormus on ladattu täyteen.
Tapa 1: Pikatoiminto
Tapa 2: Tavallinen tapa
Siirry kohtaan 'Asetukset -> Laitteiden hallinta -> Sormuksen pariliitos', napsauta 'Muodosta pariliitos' ja käynnistä sitten sormus.
Silmälaseilla otettuja valokuvia ja videoita voi tällä hetkellä katsella mobiilisovelluksessa:Siirry kohtaan Albumi→Silmälasialbumi→Siirry siirtotilaan→Yhdistetty, niin saat kuvat ja videot sovellukseen.

【APK:n asentaminen】
Voit asentaa APK:n älylaseihisi yhdistämällä ne tietokoneeseesi ADB:n kautta.
Katso ADB:n käyttöohjeet osoitteesta: https://developer.android.com/tools/adb
The latest version of the system, 1.2.66 and above, has added restrictions on adb installation. You can first enable the permission with the following command:
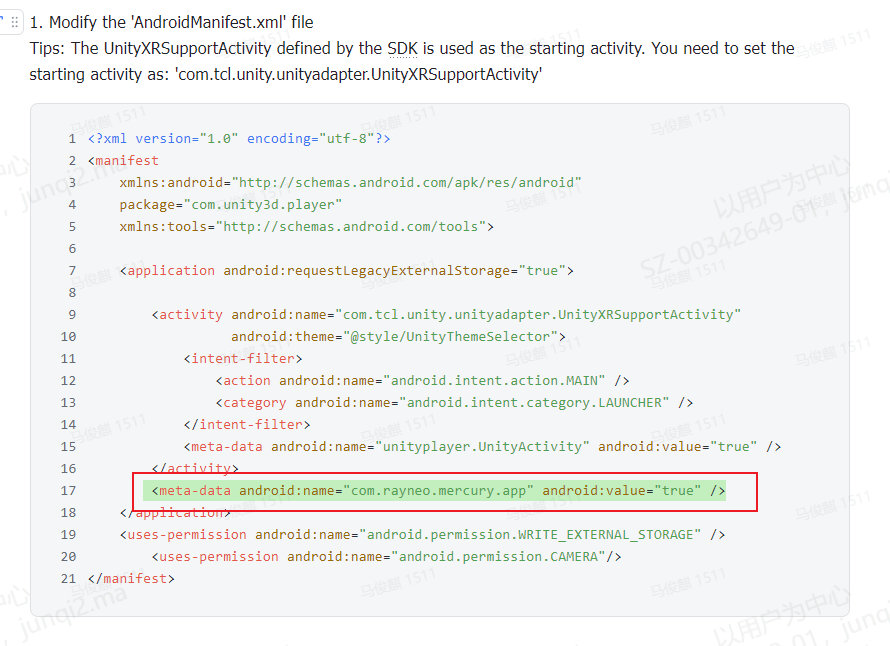
adb shell settings put global mercury_install_allowed 1After installing the third-party apk, you can find the corresponding entry in the "app center". If the entry is not found, you need to check whether the AndroidManifest.xml file has been configured correctly .
Koska silmälasit ovat päähän puettavia laitteita, kehittäjien saattaa olla tarpeen simuloida ja testata niitä tietokoneella kehitysprosessin aikana. Näytön projisointiin suositellaan seuraavia työkaluja:
Tilanne yksi: Pariliitoksen palauttaminen alkuperäisen puhelimen kanssa
Kuten kuvassa näkyy, jos automaattinen yhteys epäonnistuu (kuten alla näkyy), kokeile seuraavia vaiheita:

Scenario Two: The Glasses Need to be Paired with Another Phone
Mercury-sovellus edellyttää Android 10:tä tai uudempaa versiota. Tarkista Android-versiosi.
Järjestelmän uusimpaan versioon 1.2.66 ja sitä uudempiin on lisätty adb-asennuksen rajoituksia. Voit ensin ottaa käyttöoikeuden käyttöön seuraavalla komennolla:
adb shell settings put global mercury_install_allowed 1
Laseissa on 3 mikrofonia. Jos tarvitset parempaa tallennuslaatua, voit valita tarpeisiisi sopivan mikrofonin. Unity kutsuu natiivirajapintakerrosta, ja voit määrittää sen alla olevien parametrien mukaan. PS: Oletusarvoisesti lasien etupuolella oleva mikrofoni on käytössä.
| Set the status notification when each apk calls mic audioHAL; AudioManager.setparameter("audio_source=xxxx"); | ||
| audio record: | not configure yet | setParameters("audio_source_record=sound") |
| camera record: | call the 2 mics on the temple, all the sound is received, no noise reduction algorithm | setParameters("audio_source_record=camcorder") |
| translation: | Call 3 mics, do not receive the user's voice, but receive external voices | setParameters("audio_source_record=translation") |
| voice assistant: | Call the 2 mics on the temple, mainly receive the user's voice | setParameters("audio_source_record=voiceassistant") |
| To make sure each application has its own mic combination, please set "setParameters("audio_source_record=off" when exit. | ||
Using the camcorder mode, when channel=2, it calls two microphones; when channel=1, it calls the microphone above the nose rest.


Alla on sovelluskehityksen ohje, jolla vältetään emolevyn ylikuumeneminen, järjestelmän sammuminen ja näytön toimintahäiriöt:


