

€489,00

 Direkt zum Inhalt
Keine Ergebnisse gefunden. Versuchen Sie ein anderes Stichwort.
Finden Sie alles, was Sie benötigen, um Ihre Glasses einzurichten, die Funktionen zu erkunden und das Beste aus Ihrem RayNeo iO-Erlebnis herauszuholen.
Sie finden die gesuchte Antwort nicht? Unser Support-Team hilft Ihnen gerne weiter. Kontaktieren Sie uns unter: service@rayneo.com
Standardversion:
Die RayNeo AI-App ist erforderlich, um den Einrichtungs- und Kopplungsvorgang für Ihre RayNeo iO AI Glasses abzuschließen. Bevor Sie Ihre Glasses aktivieren, laden Sie bitte die RayNeo AI-App herunter und installieren Sie sie auf Ihrem Smartphone.
App herunterladen https://rayneo.cn/commonPage/venus/appDownload/index_m.html
Scannen Sie den untenstehenden QR-Code zum Herunterladen:

Bitte stellen Sie Folgendes sicher:
Während der Einrichtung fordert die RayNeo AI-App möglicherweise Berechtigungen an, die für die Geräteverbindung und intelligente Funktionen erforderlich sind. Bitte erteilen Sie die erforderlichen Berechtigungen und befolgen Sie die in der App angezeigten Anweisungen.
(Berechtigungsdetails sollten auf Basis der finalen App-Version bestätigt werden.)
Bevor Sie Ihre RayNeo iO AI Glasses zum ersten Mal verwenden, führen Sie den Aktivierungs- und Kopplungsvorgang anhand der folgenden Schritte durch.
Schritt 1: Ihre Glasses aktivieren
Schritt 2: Vorbereitung für die Blautooth-Kopplung
Wenn die Glasses in den Kopplungsmodus wechseln, zeigt die Anzeigeleuchte an der Bügelspitze ein blaues pulsierendes Licht.
Schritt 3: Kopplung in der App abschließen
Sobald die Kopplung abgeschlossen ist, verbinden sich die Glasses automatisch mit Ihrem Smartphone.
Nach der ersten erfolgreichen Kopplung:
Sie müssen die Glasses nicht jedes Mal manuell koppeln, wenn Sie sie verwenden.
Android-Nutzer befolgen bitte die Anweisungen in der App unter Hintergrundaktivität zulassen Das Zulassen der Hintergrundaktivität hilft, die RayNeo AI-App im Hintergrund am Laufen zu halten, wodurch die Blautooth-Verbindung stabiler bleibt und Verbindungsunterbrechungen reduziert werden, wenn der Bildschirm ausgeschaltet wird oder die App in den Hintergrund wechselt.
So verbinden Sie Ihre Glasses mit einem anderen Smartphone:
Wenn die Glasses keine Verbindung herstellen können:
Wenn die Anzeigeleuchte rot leuchtet oder nicht aufleuchtet, ist möglicherweise ein Problem beim Laden aufgetreten. Bitte
Die Anzeigeleuchte zeigt den aktuellen Status Ihrer RayNeo iO AI Glasses.
| Anzeigeleuchte | Status |
|---|---|
| Blau | Kopplung |
| Gelb | Aufladen |
| Grün | Vollständig aufgeladen |
| Rot | Ladefehler |
| Weiß | Mikrofon aktiv |
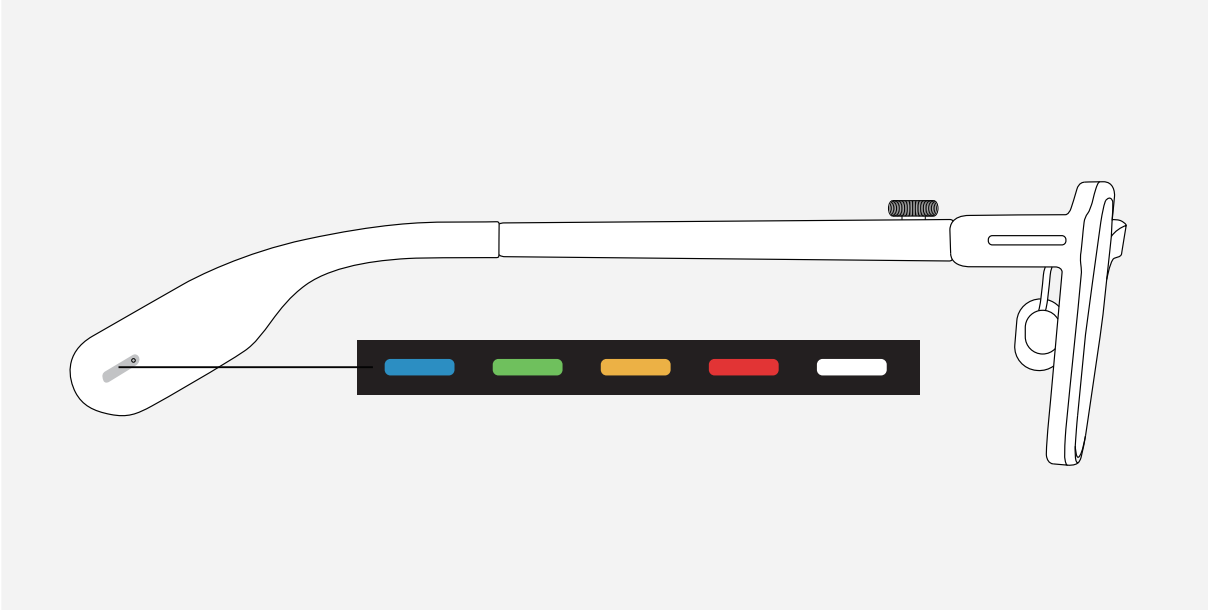
RayNeo iO AI Glasses unterstützen zwei Lademethoden:
Wählen Sie die Lademethode, die am besten zu Ihren Bedürfnissen passt.
Der Ladeclip ist die Standardlademethode für RayNeo iO AI Glasses.
So laden Sie die Glasses auf
| Anzeigeleuchte der Glasses | Status |
|---|---|
| Weißes pulsierendes Licht | Einschalten |
| Blaues pulsierendes Licht | Kopplungsmodus (bereit, ein neues Smartphone zu verbinden) |
| Weißes Licht | Mikrofon in Verwendung |
| Gelbes Licht | Aufladen |
| Grünes Licht | Aufladen abgeschlossen |
| Rot blinkend | Ladefehler |
Wenn Sie das RayNeo iO Brillen-Ladeetui separat erworben haben, können Sie Ihre RayNeo iO AI Glasses aufladen, indem Sie die Brille in das Ladeetui legen. Das Brillen-Ladeetui bietet eine bequemere Ladelösung, wenn Sie unterwegs sind oder keine Stromquelle in der Nähe haben.
So laden Sie die Glasses auf
Während des Aufladens:
| Anzeigeleuchte des Ladeetuis | Status |
|---|---|
| Grünes Licht | Ausreichende Ladung |
| Gelbes Licht | Begrenzte Ladung |
| Rot blinkendes Licht | Niedrige Ladung und Glasses können nicht aufgeladen werden |
| Rot blinkend | Ladefehler |
| Grünes pulsierendes Licht | Aufladen abgeschlossen |
| Gelbes pulsierendes Licht | Aufladen |
| Blaues pulsierendes Licht | Die Glasses im Etui befinden sich im Kopplungsmodus |
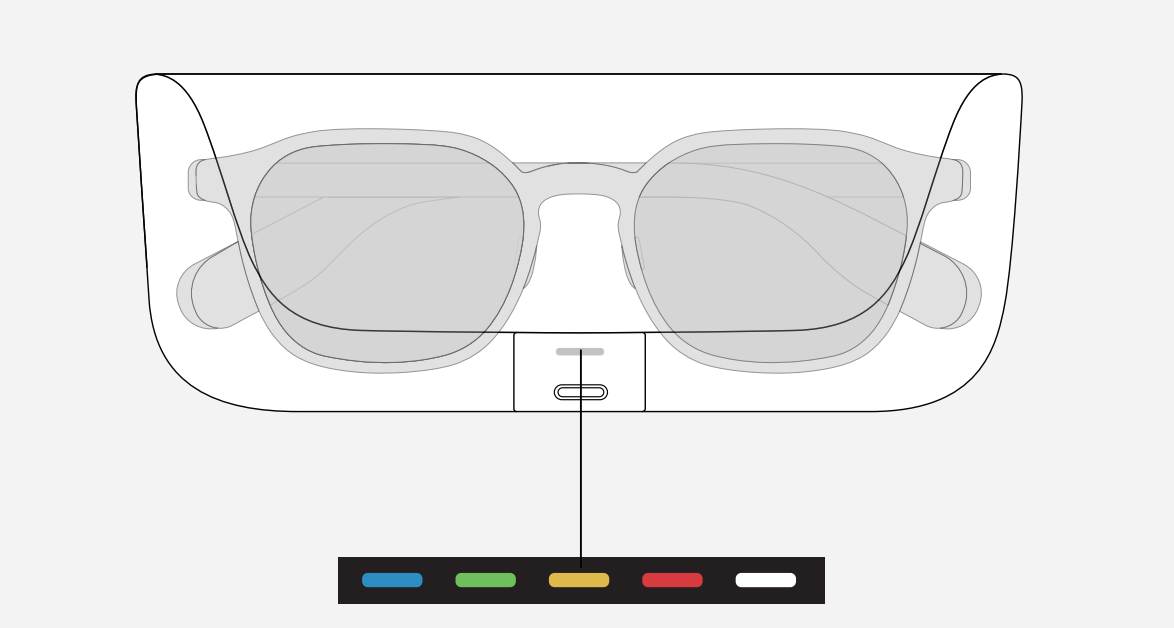
Sie können den verbleibenden Akkustand sowohl der Glasses als auch des Ladeetuis in der RayNeo AI-App überprüfen.
RayNeo iO AI Glasses bieten intuitive Steuerungsmöglichkeiten über die Smart Crown, Kopfbewegungen und App-Einstellungen. So können Sie auf natürliche Weise mit Informationen interagieren, ohne häufig Ihr Smartphone verwenden zu müssen.
Die Smart Crown befindet sich an der oberen Vorderseite des rechten Bügels. Damit können Sie schnell durch Menüs navigieren, Funktionen auswählen und Ihre Glasses steuern.
| Bedienung | Funktion |
|---|---|
| Smart Crown drehen | Dashboard, App-Liste und verschiedene Listen durchsuchen. Elemente werden nacheinander in der in der App festgelegten Reihenfolge angezeigt. |
| Einmal klicken | Ein Element auswählen oder öffnen. Wenn das Display ausgeschaltet ist, aktiviert ein einmaliges Drücken das Dashboard. |
| Gedrückt halten | Zur Startseite des Dashboards zurückkehren. |
Sie können zusätzliche Smart Crown-Aktionen anpassen unter:
Registerkarte Glasses → Einstellungen → Smart Crown-Steuerelemente
Sie können häufig verwendete Funktionen den folgenden Aktionen zuweisen:
Mit dem Head-Up-Display können die Glasses das Display automatisch aktivieren, wenn Sie den Kopf auf einen voreingestellten Winkel anheben.
Wenn aktiviert:
Sie können den Auslösewinkel anpassen unter:
Registerkarte Glasses → Einstellungen → Head-Up-Display
Verfügbare Einstellungen:
Die Kopfsteuerelemente ermöglichen es Ihnen, durch einfache Kopfbewegungen mit Benachrichtigungen und RayNeo Vorschlägen zu interagieren, ohne Ihre Hände zu benutzen.
Wenn eine Benachrichtigung oder ein RayNeo Vorschlag erscheint:
Sie können diese Funktion verwalten unter:
Registerkarte Glasses → Kopfsteuerelemente
Sie können die Display-Position anpassen, um ein angenehmeres Seherlebnis zu erzielen.
Display-Position anpassen
Passen Sie die Display-Position entsprechend Ihrer Betrachtungspräferenz an.
Fokus-Modus trägt dazu bei, Unterbrechungen zu reduzieren, indem er ausgewählte proaktive Inhalte stummschaltet.
Wenn der Fokus-Modus aktiviert ist, werden die folgenden Inhalte stummgeschaltet:
Sie können den Fokus-Modus wie folgt steuern:
Sie können auch einen wiederkehrenden Zeitplan für den Fokus-Modus festlegen.
Das Dashboard ist die Hauptoberfläche zum Anzeigen von Informationen auf den RayNeo iO AI Glasses. Es bietet Schnellzugriff auf: Zeit, Wetter, Akkustand, Kalender, To-Dos, Aktien, E-E-Mail, Weltzeituhr.
Das Dashboard hilft Ihnen, wichtige Informationen einzusehen, ohne Ihr Smartphone herausholen zu müssen.
Sie können das Dashboard auf zwei Arten öffnen:
Head-Up-Display
Heben Sie den Kopf auf den voreingestellten Winkel an, um das Display automatisch einzuschalten und das Dashboard aufzurufen.
Smart Crown
Wenn das Display ausgeschaltet ist, drücken Sie einmal auf die Smart Crown, um das Dashboard zu aktivieren.
Drehen Sie die Smart Crown, um die Dashboard-Widgets nacheinander zu durchsuchen. Die Widgets werden in der Reihenfolge angezeigt, die in der RayNeo AI-App festgelegt ist.
Halten Sie die Smart Crown gedrückt, um zur Startseite des Dashboards zurückzukehren.
Vom Dashboard aus:
Das Dashboard unterstützt bis zu 5 Widgets gleichzeitig. Verfügbare Widgets umfassen:
| Widget | Beschreibung |
|---|---|
| To-Do | Zeigt Ihre Aufgabeninformationen an. Wenn es zu viele Elemente gibt, werden automatisch Widgets hinzugefügt. |
| Kalender | Zeigt laufende und bevorstehende Ereignisse basierend auf Ihrer verbundenen Kalenderquelle an, einschließlich ganztägiger Ereignisse. |
| Wetter | Zeigt aktuelles Wetter, Temperatur, die heutigen Höchst- und Tiefstwerte sowie den 5-Stunden-Wettertrend an. |
| Aktien | Zeigt Aktienkurse und prozentuale Veränderungen für die von Ihnen verfolgten Aktien an. |
| Zeigt die neuesten ungelesenen E-E-Mails und die Gesamtzahl ungelesener E-E-Mails aus Ihrem verbundenen Postfach an. | |
| Weltzeituhr | Zeigt Ortszeit, Zeitzone und Zeitdifferenz für eine ausgewählte Stadt an. |
Das Dashboard zeigt außerdem grundlegende Informationen an, wie zum Beispiel: Aktuelle Uhrzeit, Akkustand der Glasses
Einige Widgets müssen zunächst eingerichtet werden, bevor sie Informationen anzeigen können. Beispiel:
Sie können Dashboard-Widgets verwalten unter:
Registerkarte Glasses → Dashboard-Einstellungen
Von hier aus können Sie: Widgets hinzufügen oder entfernen, Widget-Reihenfolge ändern
Das Dashboard unterstützt zwei Anzeigemodi:
Im Klassischen Modus werden Widget-Karten mit detaillierten Informationen angezeigt.
Der Minimal-Modus bietet eine übersichtlichere Ansicht und zeigt nur Folgendes an: Uhrzeit, Wetter, Akkustand
Sie können die Dashboard-Anzeigemodi in der RayNeo AI-App wechseln.
RayNeo iO AI Glasses bieten Echtzeit-Spracherkennungs- und Echtzeit-Übersetzungsfunktionen, damit Sie in Konversationen, Meetings und mehrsprachigen Szenarien leichter kommunizieren können.
Was ist Live-Untertitel?
Live-Untertitel wandelt die Sprache anderer Personen in Echtzeittext um und zeigt die Untertitel direkt in Ihrem Sichtfeld an. Dies hilft Ihnen, wichtige Informationen in Situationen wie den folgenden zu erfassen:
Mit dem eingebauten Mikrofonarray können die Glasses die Sprache der Menschen in Ihrer Umgebung erkennen und von Ihrer eigenen Stimme unterscheiden. Live-Untertitel priorisiert die Stimme des Gesprächspartners und filtert Ihre eigene Sprache heraus, damit Sie sich auf die Informationen konzentrieren können, die am wichtigsten sind.
Live-Untertitel unterstützt die wechselseitige Übersetzung in 55 Sprachen .
Live-Untertitel starten
Sie können Live-Untertitel auf zwei Arten starten:
Von den Glasses:
Von der RayNeo AI-App aus
Vor dem Start: Wählen Sie die Sprache aus, die Ihr Gesprächspartner spricht. Stellen Sie sicher, dass Ihr Smartphone eine verfügbare Netzwerkverbindung hat. Die Glasses erkennen die Sprache anhand der ausgewählten Sprache und zeigen Untertitel in Echtzeit an.
Anzeige der Untertitel
Live-Untertitel zeigt hauptsächlich die Sprache Ihres Gesprächspartners an und filtert Ihre eigene Stimme heraus. Dadurch können Sie sich während einer Konversation auf die Informationen konzentrieren, die Sie benötigen.
Vorherige Untertitel ansehen
Sie können während einer aktiven Live-Untertitel-Sitzung vorherige Untertitel ansehen. So sehen Sie vorherige Untertitel an:
Nach einer kurzen Pause kehrt das Display automatisch zur laufenden Konversation zurück.
Untertitel-Aufzeichnungen speichern und verwalten
Sobald eine Konversation endet, wird das vollständige Transkript in Sitzungen . Unter Sitzungen können Sie:
Die Echtzeitübersetzung ist eine erweiterte Funktion von Live-Untertitel, die zweisprachige Konversationen von Angesicht zu Angesicht ermöglicht.
So starten Sie die Funktion:
Während der Übersetzung:
Während der Stimmwiedergabe pausiert die Audioaufnahme automatisch. Nach Beendigung der Konversation werden der Originaltext und der übersetzte Text nebeneinander gespeichert. Nachrichten werden als Sprechblasen angezeigt. Jeder Sprecher ist gekennzeichnet.
Die Live-Kalibrierung steuert, wie übersetzter Text während der Echtzeitübersetzung angezeigt wird. Sie können diese Einstellung je nach Ihrer Präferenz für Geschwindigkeit oder Stabilität anpassen.
Wenn die Live-Kalibrierung eingeschaltet ist: Die Übersetzung wird Wort für Wort aktualisiert, während die Person spricht. Der Text erscheint schneller, kann sich aber während des Gesprächs verschieben.
Wenn die Live-Kalibrierung ausgeschaltet ist: Die Übersetzung erscheint, nachdem der vollständige Satz erkannt wurde. Die Textanzeige ist stabiler.
Die RayNeo iO AI Glasses ermöglichen es Ihnen, Konversationen schnell aufzuzeichnen und KI-gestützte Zusammenfassungen zu erstellen, ohne Ihr Smartphone in der Hand zu halten oder zusätzliche Aufnahmegeräte zu verwenden. Mit Sprachmemo können Sie Gespräche aufzeichnen, Sprache in Text umwandeln und strukturierte Zusammenfassungen erstellen, die wichtige Punkte und Aktionspunkte enthalten.
Sie können die Aufnahme auf verschiedene Weise starten:
Sprachmemo unterstützt zwei Aufnahmemodi:
Sie können während der Aufnahme wichtige Momente markieren. So fügen Sie eine Markierung hinzu:
Hinweise:
Sie können die Aufnahme auf drei Arten beenden:
Die Aufnahme wird nach Beendigung automatisch gespeichert.
Nach der Aufnahme wird das Transkript in den Sitzungen generiert. Sprachmemo unterstützt:
Bei aktivierter Sprechererkennung kann das System verschiedene Sprecher unterscheiden und Sprecher umbenennen. Nachdem die Transkription abgeschlossen ist, generiert die KI automatisch eine strukturierte Zusammenfassung, die Folgendes umfasst: Wichtigste Schlussfolgerungen, To-Dos. Sie können auch Vorlagen verwenden, um Zusammenfassungen aus verschiedenen Perspektiven zu generieren.
Gespeicherte Aufzeichnungen und generierte Inhalte finden Sie unter Sitzungen . Sie können:
Sprachunterstützung Sprachmemo-Transkription unterstützt: 96 Sprachen
Die RayNeo iO AI Glasses nutzen ein Nahfelddisplay und Spracherkennung, um Ihr Skript direkt in Ihrem Sichtfeld anzuzeigen, sodass Sie natürlich sprechen können, während Sie mit Ihrem Publikum Blickkontakt halten.
Sie können auch Textgröße, Zeilenabstand, Breite und Anzeigetiefe ganz nach Ihren Vorlieben feinabstimmen, oder die vorgefertigten Szenen unten verwenden.
Wählen Sie den Modus, der zu Ihrer Sprechweise passt, und wechseln Sie jederzeit:
Wechseln Sie zwischen vorgefertigten Szenen für verschiedene Einstellungen – wie etwa Präsentation und Videoaufzeichnung –, um mit einem Fingertipp das beste Layout anzuwenden.
Erstellen oder importieren Sie ein Skript in der RayNeo AI-App – die Formate txt, docx und pdf werden unterstützt – oder öffnen Sie die App-Liste auf den Glasses und wählen Sie Teleprompter aus.
Neues Skript erstellen:
Skripte importieren: Sie können Skripte aus Systemdateien importieren. Unterstützte Formate: TXT, DOC, DOCX, PDF. Nach dem Importieren werden Formatierungen entfernt, Bilder gefiltert und nur Textinhalte beibehalten.
Skriptverwaltung: Skripte sind organisiert nach: Angeheftet, Zuletzt verwendet. Skripte werden nach Aktualisierungszeit sortiert. Verfügbare Aktionen: Nach links wischen zum Löschen, nach rechts wischen zum Anheften, auf eine Skriptkarte tippen zur Vorschau.
Sie können den Teleprompter auf zwei Arten starten:
Nach dem Öffnen auf den Glasses:
Während der Nutzung:
RayNeo iO AI Glasses bieten sprachbasierte KI-Interaktion, sodass Sie Funktionen steuern, Fragen stellen und durch natürliche Gespräche auf Ihre persönlichen Aufzeichnungen zugreifen können.
Sie können RayNeo AI auf drei Arten aktivieren:
RayNeo AI unterstützt drei Arten von Interaktionen:
Gerätesteuerung
Sie können Sprachbefehle verwenden, um Funktionen wie die folgenden zu steuern:
Informationsabfragen
Fragen Sie RayNeo AI nach Informationen wie: Wetter, Feiertage, Nachrichten, Allgemeine Wissensfragen
Abfragen zu persönlichen Aufzeichnungen
RayNeo AI kann Ihre persönliche Datenbank durchsuchen, um Fragen anhand Ihrer gespeicherten Aufzeichnungen zu beantworten. Unterstützte Quellen umfassen: Sprachmemo, Live-Untertitel, Andere gespeicherte Aufzeichnungen
Beispiel: „Was waren meine Aktionspunkte aus der Besprechung letzter Woche?“
Sie können über die RayNeo AI-App mit RayNeo AI interagieren. Sie können eine Konversation starten über: RayNeo AI-Seite, Seite „Sitzungen“. Sie können Ihre Frage eingeben oder sprechen.
Suche in Ihren Aufzeichnungen RayNeo AI kann Fragen anhand Ihrer persönlichen Datenbank beantworten. Sie können den Suchbereich mithilfe von Datentyp-Tags anpassen, z. B.: Sprachmemo, Echtzeit-Untertitel, Life Log. Sie können Tags je nach Bedarf hinzufügen oder entfernen. Sie können eine von KI erzeugte Antwort auch mit einem Fingertipp als neue Zusammenfassungsregisterkarte speichern.
RayNeo iO AI Glasses unterstützen flexible KI-Modelloptionen, sodass Sie das KI-Erlebnis wählen können, das am besten zu Ihren Bedürfnissen passt.
Auswahl der KI-Modelle: Nutzer können aus den folgenden Optionen wählen: RayNeo AI, Mehrere gängige KI-Modelle
KI-Dienste einschließlich: RayNeo AI-Assistent auf den Glasses, „KI fragen“ in der RayNeo AI-App, KI-Zusammenfassungen, Weitere KI-gestützte Funktionen. Sie können Ihr bevorzugtes KI-Modell verwenden.
Wenn Sie eine Mitgliedschaft abonnieren, werden zusätzliche erweiterte KI-Modelle freigeschaltet.
Die richtige Pflege trägt dazu bei, das Aussehen, den Tragekomfort und die optische Leistung Ihrer RayNeo iO AI Glasses zu erhalten.
RayNeo iO AI Glasses unterstützen Korrekturgläser.
So schützen Sie die Gläser und den Rahmen:
Zur täglichen Pflege:
Beschichtete Gläser bieten ein klareres und transparenteres Seherlebnis, können jedoch leichter Fingerabdrücke und Verschmutzungen zeigen.
Zum Schutz der Beschichtung: Vermeiden Sie den Kontakt mit Folgendem:
Falls Staub, Sandpartikel oder starke Ölflecken vorhanden sind:
Halten Sie Metallteile sauber und vermeiden Sie den Kontakt mit chemischen Substanzen wie Säuren und Laugen.
Schweiß, Kosmetika und Haarspray können Folgendes verursachen:
Sollten diese Substanzen mit den Glasses in Kontakt kommen, wischen Sie sie sofort mit einem speziellen Brillenputztuch oder einem Papiertaschentuch ab.
RayNeo iO AI Glasses sind mit Datenschutz-Anzeigeleuchten und Bedienelementen ausgestattet, die Ihnen bei der Verwaltung Ihrer Daten helfen.
Wenn Sprachmemo oder mikrofonbezogene Funktionen aktiv sind, leuchtet eine weiße Anzeigeleuchte an der Bügelspitze auf.
Life Log speichert keine Original-Audioaufnahmen. Es werden lediglich folgende Daten aufbewahrt:
Original-Audioaufnahmen werden nicht gespeichert.
Sie können Ihre persönlichen Profil-Tags unter Über Sie .
Alle langfristigen Profil-Tags können wie folgt bearbeitet werden:
Sie behalten die Kontrolle über Ihre persönlichen Profilinformationen.
Dieser Abschnitt enthält Lösungen für häufige Probleme mit den RayNeo iO AI Glasses.
Der Bildschirm ist unvollständig, unscharf oder verschoben
Wenn das Display unvollständig, unscharf oder verschoben erscheint:
Passen Sie die Displayeinstellungen an, bis das Bild angenehm zu betrachten ist.
Blautooth-Verbindungsprobleme oder häufige Verbindungsabbrüche
Versuchen Sie Folgendes:
Android-Nutzer Follow the in-app Hintergrundaktivität zulassen Damit die RayNeo AI-App im Hintergrund weiterläuft. Dies hilft, die Blautooth-Stabilität aufrechtzuerhalten und Verbindungsabbrüche zu reduzieren, wenn: Der Bildschirm des Smartphones ausgeschaltet ist, Die App in den Hintergrund wechselt.
Nach dem Wechsel des Smartphones kann keine Verbindung hergestellt werden
Wenn Sie die Glasses mit einem neuen Smartphone verbinden:


