


€489,00

 Gå til indholdet
1. Device pairing is required to complete the subsequent distribution network, connection, and other operations when first activating the glasses;
2. Please install the APP on the mobile phone, and open the APP for pairing operation;

You can refer to the following image to switch the system language.

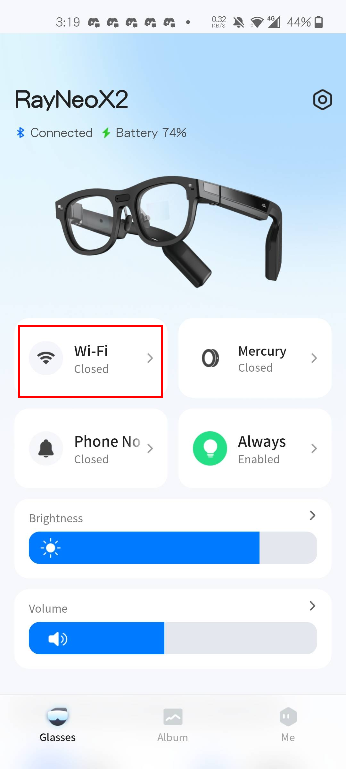
Currently, it is not possible to input text directly via glasses, so a mobile phone is required to connect to WiFi. After successfully pairing with the glasses, click on the WiFi module (as indicated in the red box in the diagram), select your network, and enter the password to connect.
For at sikre en problemfri parring skal du først sørge for, at ringen er fuldt opladet.
Metode 1: Genvej
Metode 2: Standardmetode
Gå til 'Indstillinger -> Enhedsadministration -> Parring af ring', tryk på 'Par', og tænd derefter ringen.
Fotos og videoer, der er taget med brillerne, kan i øjeblikket ses i mobilappen: Gå til Album→Brillealbum→Aktivér overførselstilstand→Tilslut for at hente billeder og videoer i appen.

【Installation af APK】
Du kan installere APK-filer på dine smartbriller ved at forbinde dem til din pc via ADB.
Se vejledningen til brug af ADB her: https://developer.android.com/tools/adb
The latest version of the system, 1.2.66 and above, has added restrictions on adb installation. You can first enable the permission with the following command:
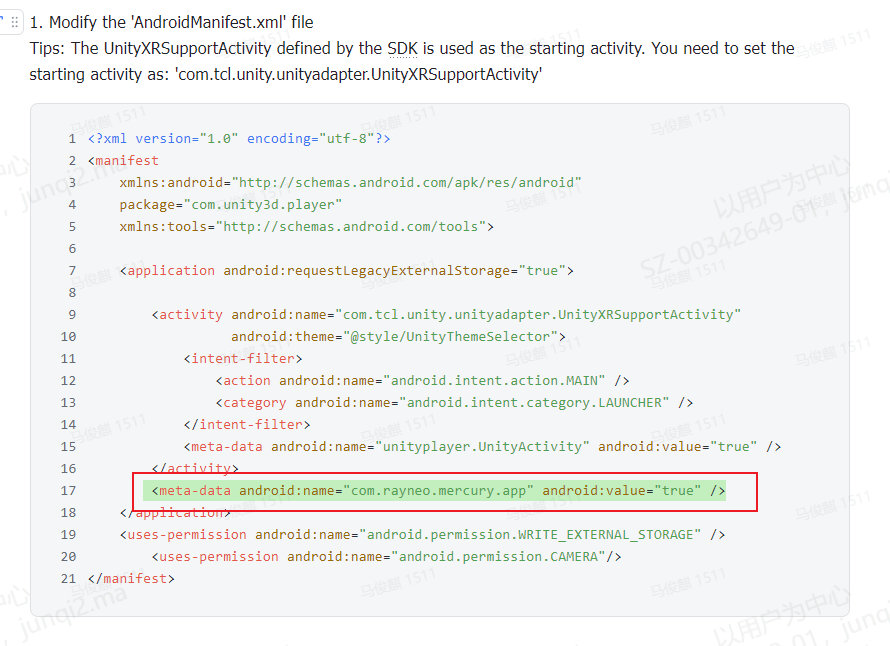
adb shell settings put global mercury_install_allowed 1After installing the third-party apk, you can find the corresponding entry in the "app center". If the entry is not found, you need to check whether the AndroidManifest.xml file has been configured correctly .
Da briller er enheder, der bæres på hovedet, kan udviklere få brug for at simulere og fejlfinde på computeren under udviklingsprocessen. Det anbefales at bruge følgende værktøjer til skærmvisning:
Scenarie et: Gendan parringen med den oprindelige telefon
Som vist på figuren kan du prøve følgende trin, hvis den automatiske forbindelse mislykkes (som vist nedenfor):

Scenario Two: The Glasses Need to be Paired with Another Phone
Mercury App skal køre på Android 10 eller nyere. Tjek din Android-version.
Den nyeste version af systemet, 1.2.66 og nyere, har indført begrænsninger for installation via adb. Du kan først aktivere tilladelsen med følgende kommando:
adb shell settings put global mercury_install_allowed 1
Der er 3 mikrofoner på brillerne. Hvis du har brug for bedre optagekvalitet, kan du vælge at bruge en af mikrofonerne efter behov. Unity kalder det native grænsefladelag, og du kan konfigurere det ud fra parametrene nedenfor.ps: Standardtilstanden aktiverer mikrofonen foran på brillerne.
| Set the status notification when each apk calls mic audioHAL; AudioManager.setparameter("audio_source=xxxx"); | ||
| audio record: | not configure yet | setParameters("audio_source_record=sound") |
| camera record: | call the 2 mics on the temple, all the sound is received, no noise reduction algorithm | setParameters("audio_source_record=camcorder") |
| translation: | Call 3 mics, do not receive the user's voice, but receive external voices | setParameters("audio_source_record=translation") |
| voice assistant: | Call the 2 mics on the temple, mainly receive the user's voice | setParameters("audio_source_record=voiceassistant") |
| To make sure each application has its own mic combination, please set "setParameters("audio_source_record=off" when exit. | ||
Using the camcorder mode, when channel=2, it calls two microphones; when channel=1, it calls the microphone above the nose rest.


Nedenfor finder du en vejledning i appudvikling, som skal hjælpe med at undgå overophedning af bundkortet, nedlukning af systemet og unormal skærmvisning:


